2016 is the International Year of Pulses

by Michelle Peters-Jones
2016 is the United Nation’s International Year of Pulses. Growing up in India however, meant that pulses, such as beans and lentils, were a staple food in my family, and not a week went by without some sort of pulse dish being on the menu. With Canada being the world’s largest exporter of lentils and peas—and second only to India in the production of beans and chickpeas—now is the time to incorporate these tasty legumes in our everyday meals.
Pulses are seeds of the leguminous family, and are broadly categorized into beans, peas, chickpeas and lentils. Pulse crops have the ability to fix nitrogen in the soil, which benefits crop cycling, one of the key reasons for the UN’s declaration. Along with agricultural benefits, pulse production is also a way to ensure food security and a more nutritious and healthy diet for everyone.
Pulses are one of my favourite ingredients to cook with, particularly since I am raising a vegetarian daughter. With regular consumption of pulses, I can ensure optimal protein and fibre in her (and our) diet. Pulses are also power-packed with vitamins and minerals and highly recommended as an essential part of any healthy diet.
Pulses are available dried or canned. I buy my pulses from several sources including local farmers Gold Forest Grains. I also stock up on canned pulses, particularly for those days that require a quick and easy meal.
Keeping this in mind, here are a few tips for cooking and storing pulses along with a few mouthwatering recipes from around the globe.
- A lot of dried pulses (with the exception of red and green lentils) will require soaking, so you will need to plan in advance. Place the required quantity of dried beans or chickpeas in a large bowl and rinse well, picking them over if required. Drain and then cover completely with cold water. Leave to soak overnight.
- Dried beans and chickpeas will usually expand significantly in size so plan accordingly. For example, one cup of dried chickpeas will give you one to two cups of cooked chickpeas.
- There has been a bit of debate about the benefits of brining the soaking water. I do add a teaspoon of salt to my soaking water but this is a personal preference.
- When ready to cook your pulses, drain and discard the soaking water. Place in a heavy-duty pot and cover again with cold water. Pick out any pulses that float.
- Bring to a boil and then turn down the heat to a level simmer.
- You might find some scummy foam rising to the surface as the pulses cook. Use a spoon and scoop this foam off and discard it.
- The pulses are cooked when they are soft and tender. This varies from pulse to pulse. For example, chickpeas and beans might take anywhere between 45 minutes to an hour, while lentils take a shorter time.
- Drain the pulses and retain the cooking water, if required, and use as directed in your recipe.
- Cooked pulses can be refrigerated for up to three days, or frozen. I like to portion out my pulses into meal-sized quantities before freezing.
- Kidney beans contain a natural toxin that can sometimes cause stomach upsets so make sure that you cook them properly, around 45-60 minutes as this destroys the toxin.
- When cooking lentils, follow similar steps, and remember that they do tend to cook more quickly.
- You don’t need to soak red and green lentils. Just rinse, then cover with cold water and cook until tender. You can skip the baking soda as well.
- If you have forgotten to soak your pulses overnight, try this simple hack. Place the pulses in a pot, cover with cold water and bring to a boil. Boil hard for five minutes, then turn off the heat and let them soak for an hour to an hour and half. Drain, rinse and proceed cooking as directed.
- Don’t leave your pulses at room temperature for too long as this can encourage bacteria.
Tips for cooking with canned beans and pulses:
- Canned pulses are a great way to incorporate pulses in your diet without spending too much time in the kitchen. I love the convenience of canned beans and chickpeas and am rarely without them in my pantry. They are easy to throw into a stew or curry and to make easy appetizers like hummus.
- Canned pulses can come in water or brine. Ideally, look for ones that don’t have added salt or sugar.
- Always rinse canned pulses well before using in order to get rid of the extra starch.
- Don’t try and replace like-for-like when measuring out canned pulses versus dried. Dried pulses expand while cooking so you will need at least double the amount of canned pulses to replace dried pulses in your recipe.
- Once you have cooked your pulses, try some of these delicious recipes from around the world.

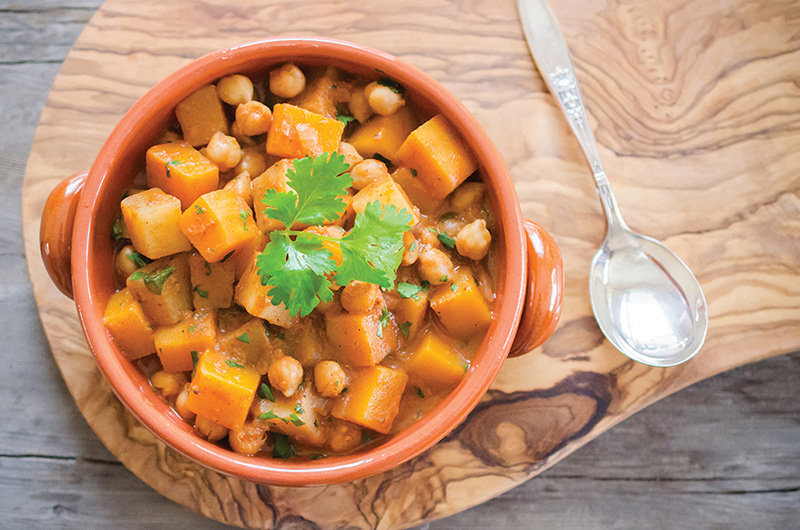
Moroccan Spiced Chickpea, Squash and Spinach Stew
This stew takes on the fragrant flavours of cinnamon and cumin and the spicy hot bite of harissa that is so quintessentially Moroccan. The spinach adds more nutrition and the potatoes and squash make for a healthy, hearty stew that is perfect for cold winter evenings.
| 1 T | canola oil |
| 1 | med onion, finely diced |
| 1 inch piece | ginger, grated |
| 3 cloves | garlic, crushed |
| 2-3 T | harissa paste (to taste) |
| 2 T | tomato paste |
| ½ t | ground cinnamon |
| ½ t | ground cumin |
| 1 | small butternut squash, peeled and cubed |
| 2 | med potatoes, peeled and cubed |
| 2 c | cooked chickpeas (cooked from dried or canned and rinsed) |
| 2 c | vegetable stock |
| 1 bunch | fresh spinach, washed and torn roughly |
| ½ | preserved lemon, finely chopped |
| salt and fresh-cracked black pepper, to taste | |
| Flatbreads or couscous, to serve |
Heat the oil in a heavy-bottomed pot, on medium heat, and add diced onion. Fry for 3-4 minutes until the raw smell disappears, then add ginger and garlic. Sauté gently for an additional minute, until fragrant. Add harissa, tomato paste, cinnamon and cumin and fry together for five to seven minutes, adding a dash of water if the mixture is too dry. Add the cubed squash and potatoes to the onion mixture. Stir and add the hot vegetable stock. Simmer for five to six minutes.
Add the cooked chickpeas. Stir everything together and leave to simmer on a low heat for twenty minutes, or until the potatoes and squash are tender. Stir in the spinach and the preserved lemon, and cook for a few minutes until the spinach wilts.
Season to taste and serve with flatbreads or couscous.
Serves 4.

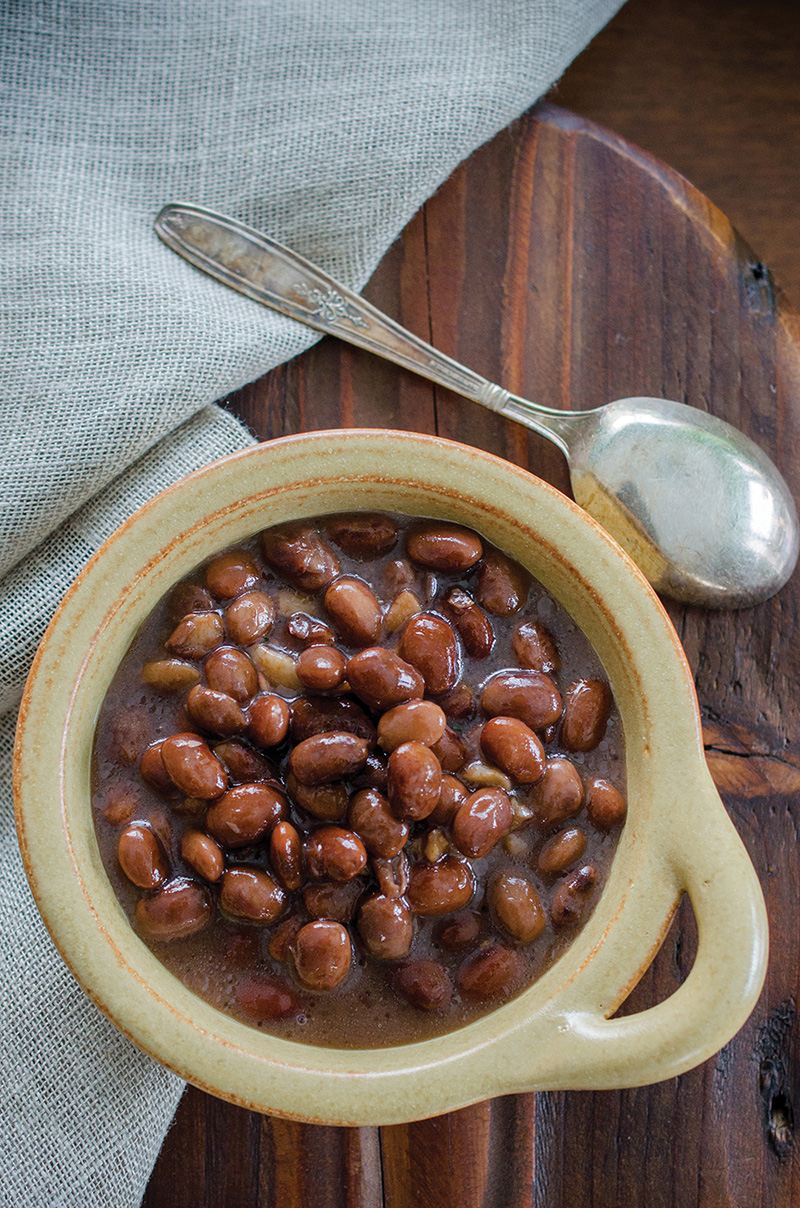
Mexican Brothy Beans and Refried Beans
This recipe is courtesy of my friend, chef Israel Alvarez, an incredibly talented chef from Mexico. Brothy beans are a Mexican staple food and every household has their own way of making them special. Israel also passed on a recipe for refried beans, which are a brilliant addition to all sorts of dishes, from tacos to enchiladas, or simply used as a dip for nachos with some fresh queso on top. You can find avocado leaves and the chipotle or arbol chile powders in Latin markets like Tienda Latina or Pariso Tropicale. Duck fat is available at the Italian Centre Shop.
Without enough water, the beans may cook unevenly and tend to stick on the bottom of the pot so make sure an inch or so of water always covers the beans.
| 2 c | dry beans (pinto or black) |
| 2 T | duck fat |
| 1 | small onion, diced |
| 2 | avocado leaves |
| 1 t | salt, or to taste |
Measure the beans into a colander, pick them over and rinse
Place in a large pot and add six cups of water.
Remove any beans that float and let them soak for 4 hours until there is no dry core when you break one open.
If you are in a hurry, quick-soak the beans by boiling them for five minutes, then letting them stand off the burner for an hour and a half. Drain the beans completely.
Cover the beans with six cups of water, add the onion, duck fat and avocado leaves and bring slowly to a simmer.
Partially cover and simmer over medium low heat, stirring occasionally until they are fully tender, about 1 to 2 hours. Add hot water if you see the beans peeking up through the liquid, to cover them by 1 inch.
Season, remove avocado leaves, and beans are ready to serve.
Makes 6 cups.
Refried Beans
| 2 T | duck fat |
| ¼ c | finely chopped white onion |
| 1¼ c | brothy beans, including liquid |
| 2 cloves | garlic, finely diced |
| ½ t | chipotle chile powder or arbol chile powder |
Heat oil in a medium saucepan. When the oil is hot, add the onion and cook, stirring often until they are soft with slightly browned edges, around ten to fifteen minutes.
Add the beans, garlic and chile powder.
Let the beans come to a simmer then let them maintain a gentle simmer. Cook, stirring and mashing until the beans resemble a very coarse puree and have thickened, around ten minutes. The beans should look like lava and they will thicken a little more once they cool.
Store in the fridge for up to five days.

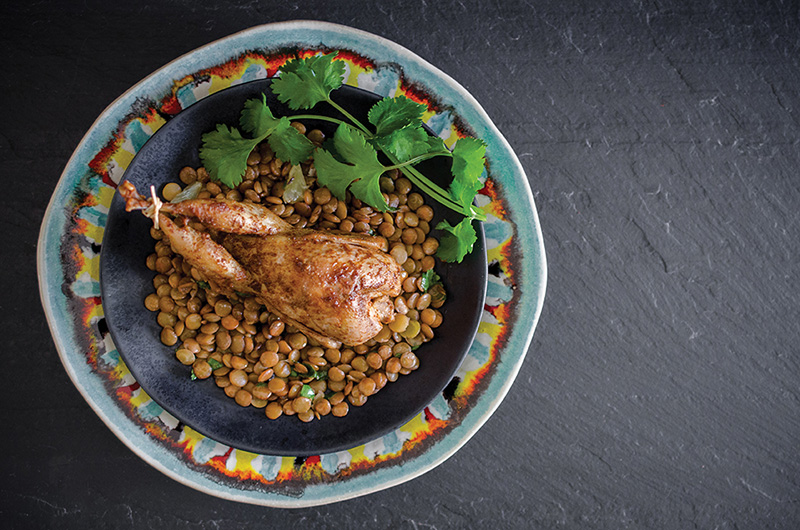
Spice-Rubbed Roast Quail with Lemon and Lentil Salad
I was browsing through Old Strathcona Farmers’ Market, and to my delight, I found a seasonal stall selling local quail’s eggs and fresh quail. Quail is my favourite bird, and I love them in many dishes including my own version of tandoori quail. For this recipe, I rubbed the quail with a blend of smoky spices, roasted them, then paired them with this spiced lentil salad with fresh lemon wedges. John Schneider of Gold Forest Grains sells whole red lentils that you can use for this dish. This recipe is perfect as either an appetizer or as a light supper. If serving as an appetizer, tear the roasted quails in half before serving.
Spice-Rubbed Quail
| 1t | coarse sea salt |
| ½ t | ground cumin |
| ½ t | sweet paprika |
| ½ t | dried thyme |
| ½ t | ground black pepper |
| olive oil, to brush | |
| 2 | whole quails, cleaned |
Stir together the salt, cumin, paprika, thyme and black pepper in a small bowl. Bring the quail to room temperature, brush all over with the olive oil and rub them evenly with the spice mixture.
Preheat the oven to 350°F. Heat a small cast iron pan on high and sear the quail, browning on all sides. Transfer the pan to the oven and cook for 10-15 minutes, depending on the size of the quail, or until the juices run clear. Take out of the oven, tent with foil, and let them rest for a few minutes.
Lentil Salad
| 1½ c | whole red or green lentils |
| salt to taste | |
| juice of 1 lemon | |
| sml handful | fresh cilantro, chopped |
Pick over the lentils and wash in several changes of water. Place them in a deep pot and cover with 5 cups of cold water. Bring to boil, and boil hard for 5-7 minutes, skimming off any scum that comes to the top. Turn down the heat and simmer the lentils for about 30 minutes, until fully tender, and just beginning to break down. Drain, reserving around ¼ cup of the cooking water, then return to the pot. Add the water to the lentils.
Dressing
| 1 T | canola oil |
| 1 t | whole cumin seeds |
| 1 clove | garlic, bruised but left whole |
Heat the oil in the pan. Add the whole cumin and garlic and fry for about 30 seconds until the seeds start to splutter and the garlic is just turning brown. Pour the entire mixture into the lentils and stir. Season to taste with salt. Stir in the lemon juice and segments. Stir in the cilantro. This salad can be served warm or cold.
To serve, portion out the lentil salad and serve with the roast quail.
Serves 4 as an appetizer, or 2 as a main course.

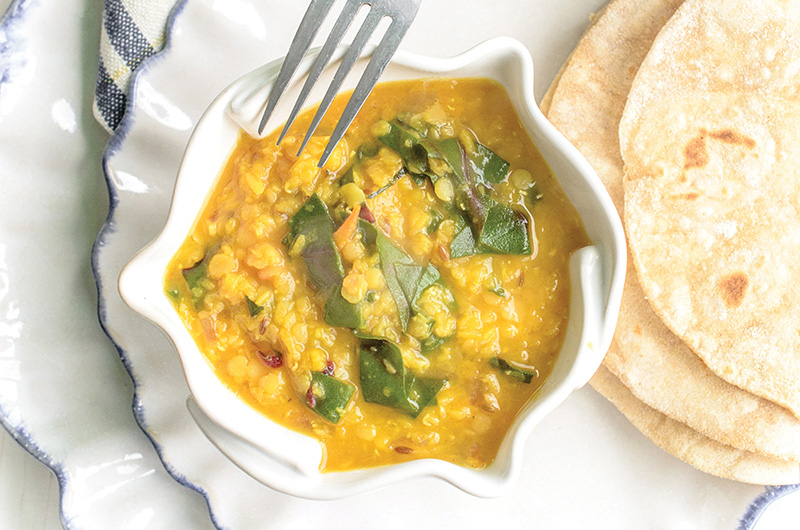
Classic Indian Dal
No other dish says home to me more than this simple Indian dal. A staple of Indian cuisine all over the country, it is one of those dishes that every expat Indian craves the taste of. Warm, comforting, lightly spiced and creamy, there is nothing better than a potful of steaming dal, eaten with rice or the flaky flatbread called roti. I have offered alternate seasoning, a North Indian-influenced with cumin and chilies, and a South Indian one with curry leaves and mustard seeds. You can buy curry leaves at any Asian grocer; I have always found them fresh at Lucky 97 Supermarket. Leftover curry leaves can be frozen in a heavy-duty ziplock bag and you can use them straight from frozen with no loss of flavour.
The seasoning, or tadka as it is known in India, is a tempering made of oil and aromatics that are added at the end of cooking. It is used for a lot of Indian dishes, in addition to dal, and it can be as quick as infusing garlic and cumin into oil and stirring it into the dish, or you can make it more complex by adding other ingredients like whole lentils, red chilies and grated coconut.
I use masoor dal or split red lentils, as they cook quickly and I don’t have to wait around. However, I have also made this dal with yellow split peas. Make sure that you keep topping up the water for yellow peas, and cook for about 1-1½ hour until the dal is fully cooked and tender. Mash the dal up before seasoning.
I have also used a combination of half yellow peas and half red lentils. Add the red lentils halfway through the cooking process (as it cooks faster) so that both dals finish cooking together.
| 2c | red masoor dal (red lentils) |
| 1½ t | canola oil |
| 1 | med onion, diced |
| 1 | tomato, diced |
| 2 cloves | garlic, crushed |
| ½” piece | ginger, grated |
| 1 | hot green bird’s eye chilli, chopped (optional) |
| 1 t | ground cumin |
| 1 t | ground turmeric |
| ½ t | chili powder (optional) |
| salt to taste | |
| Lrg handful | fresh cilantro, chopped, to garnish (leave out if using the alternate tempering) |
North Indian Seasoning
| 1T | oil |
| 1½ t | whole cumin seeds |
| 1 clove | garlic, lightly smashed but left whole |
| 2 | whole mild long red chillis |
South Indian Seasoning
| 1T | oil |
| 1½ t | black mustard seeds |
| 1 clove | garlic, smashed |
| 1-2 sprigs | curry leaves, picked (around 10 leaves) |
| 2 | whole mild long red chillis |
Wash the dal in several changes of water. Place the washed dal in a heavy pot, then cover with cold water. Cook for anywhere between 20-40 minutes until the dal is mushy and completely cooked and tender. Keep aside.
If there is too much water, boil rapidly, reducing the dal down to a creamy consistency. Meanwhile, heat the 1½ teaspoon oil in a pan and add the onions. Fry for about 5-7 minutes, until the onion is lightly-coloured. Add the garlic, ginger and chiles (if using) and the ground cumin and turmeric and chili powder. Sauté for about 30 seconds.
Add the chopped tomatoes to the pan and cook, stirring for another 5-7 minutes until the tomatoes are cooked and mushy. Add this onion/tomato masala to the cooked dal, mixing it in well. Season with salt to taste (I use about 1½ teaspoon, but feel free to reduce or increase to taste). For the tempering, heat the oil in a pan till quite hot, then add the cumin, garlic and chillis, and sauté for about 30 seconds until the garlic starts turning brown and the chillis darken, (same process for the South Asian spices). Pour the tempering over the masala dal, and cover with the lid. Stir it all together before serving. Dals can be served with any Indian breads or rice and I have also had it on its own, like soup.
Serves 4-6 as a side dish.
English Baked Beans
I lived in England for almost 11 years before moving to Canada. As a starving graduate student, my staple meal was English baked beans, fried eggs and toast. Even today, the smell of baked beans takes me right back to my student hall days. Full English breakfasts are legendary and baked beans are an essential part of it.
I’ll be honest, the reason I ended up developing my recipe for Heinz-style English baked beans was simply because I refused to pay five bucks for a can that costs about 40 pence back in England. But since then, I’ve certainly gotten used to the taste of these beans and I always have some in my freezer, ready for a jolly old English fry up, or several.
Soak the beans in cold water overnight. The next day wash and drain them, cover with cold water, add the baking soda and cook for about 1 hour on a medium heat until they are tender, and just beginning to split. Drain and keep aside. Note: Here’s an alternate method, if you aren’t organized enough to soak overnight; pick over and wash the beans, cover with cold water. Then bring to boil over high heat, let boil for 5 minutes, and turn off the heat. Cover and soak for 1 hour, then cook as normal. In a heavy-based pot heat the oil and add the onion. Sauté for about 5-10 minutes on medium heat and then add the chopped herbs and the garlic. Stir and cook for another minute or two, until the garlic is fragrant. Add the tomatoes, breaking them up a bit.Add the Worcestershire and Tabasco sauces, cloves, sugar and salt. Stir and simmer for about 20-30 minutes. Let cool completely. When cool, puree well in a blender till the mixture turns to a smooth sauce. Return to the pot, taste and readjust seasoning. Add the beans to the sauce mixture and cook on a low heat for at least 30-45 minutes, or more, until the beans are very soft. The beans taste better the next day when they have had a chance to absorb the flavours better, but they’re not bad on the day either. Alternatively, mix the sauce and beans in a heavy pan, cover tightly with a lid or foil and bake in a low oven (125°C) for about 2 to 3 hours or until the beans are soft. If making in the oven, keep checking to see that the beans haven’t dried out. It may be a good idea to reserve some sauce to add to them if they are drying out. Serve with a full English breakfast or on toast.Makes a lot of beans.
| 2 c | dried white beans (haricot or navy) |
| ½ t | baking soda |
| 2 T | canola oil |
| 1 | large onion, diced |
| 1 T | chopped thyme or sage |
| 2 cloves | garlic, crushed |
| 5 c | crushed tomatoes (I use Italian strained tomatoes, plain, without any herbs) |
| 2 | cloves |
| 4 T | Worcestershire sauce |
| 1 t | Tabasco sauce |
| ½ c | sugar, or to taste |
| salt to taste |